Exploring the Suffolk Virginia Night Sky – Astronomy, Astrophotography, Telescopes, EAA – Planets and Stars and Nebula and Galaxies – Looking, Learning, Sharing… Let's see what we can see…
Since I am primarily using NINA on the mini-PC to control my astronomy imaging sessions I have a few Raspberry Pis which are currently idle. I still have one built up for INDI Server so I can still use KStars/Ekos if I want and to do some tinkering with RaspAstroWeb, but I have a Raspberry Pi 4 2 GB with a 10.1″ display that was running Astroberry but is not currently being used. I decided to use this Raspberry Pi to set up a weather display for my desk using Pi Weather Station. Internet connectivity is required since the weather data is retrieved from online sources, not from sensor attached to the Pi.
This post provides an overview of how I set up the Pi Weather Station:
Build and Configure the Raspberry Pi
Installing Pi Weather Station from GitHub
Starting Pi Weather Station Automatically at Boot
Configure Pi Weather Station API Keys and Location
Launching Chromium and Pi Weather Station with the Desktop
Build and Configure the Raspberry Pi
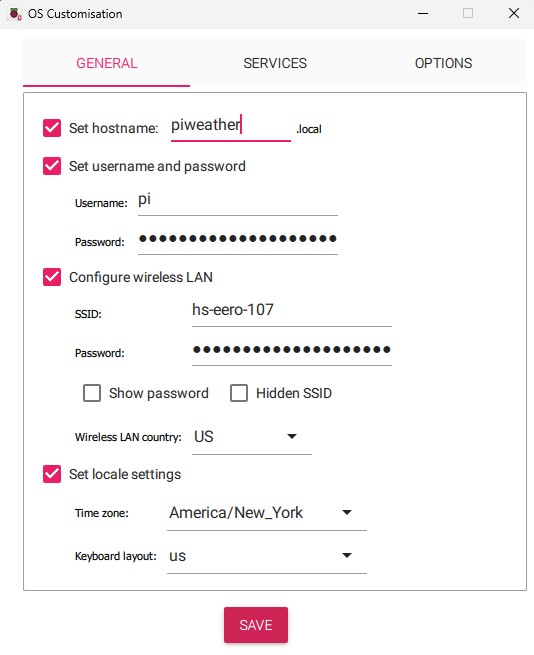
I downloaded and installed the latest Raspberry Pi Imager to write the current 64-bit Raspberry Pi OS image to a 32 GB SD Card. I configured the hostname, username and password, Wifi settings, and enable SSH (the Services tab) as part to the installation customization in the Raspberry Pi Imager. Once the OS is installed on the SD card, boot it up in the Raspberry Pi.
Connect to the Pi via SSH using your favorite SSH client (Putty). Since the Pi is connected to a 10.1″ Display I could connect a keyboard and mouse up and work directly on the Pi, but I prefer to connect via SSH. Run the package management utility (apt) to make sure everything is up to date. sudo apt update
sudo apt upgrade -y Installing Pi Weather Station from GitHub
I created a Projects directory in my home directory (/home/pi) and then cloned the Pi Weather Station project using git. mkdir -p ~/Projects
cd Projects
git clone https://github.com/jimmysombrero/pi-weather-station
cd pi-weather-station
npm install
This fork of the original pi-weather-station is updated to fix the right side current conditions, 24 hour and 5 day predications.
I don’t remember having to install any other packages to get Pi Weather Station to install. Everything was in the base Raspberry Pi Desktop OS install.
The Pi Weather Station Readme has instructions on how to configure it to be able to be accessed from another machine. I want to do this so can test. In the file server/index.js find the line: app.listen(PORT, "localhost", async () => {
Remove the “localhost”, so the line looks like this: app.listen(PORT, async () => {
When the Pi Weather Station is running it is now accessible from a remote system. To test this start the Pi Weather Station cd ~/Project/pi-weather-station
npm start
You should be able to access it from a browser on a remote machine on the same network using the url http://piweather_hostname_or_IP:8080
This is pretty handy for testing but not necessary. It definitely more secure if you can only access it from localhost. If you are worried about others on the network accessing the API keys, just revert back to the original line once you have finished testing.
Starting Pi Weather Station Automatically at Boot
To get the Pi Weather Station to start automatically when the Pi boots I created a file piweatherstation.service with the following: [Unit]
Description=Pi Weather Station
After=network.target
[Service]
Type=idle
User=pi
WorkingDirectory=/home/pi/Projects/pi-weather-station
ExecStart=/usr/bin/node /home/pi/Projects/pi-weather-station/server/index.js
Restart=always
RestartSec=5
[Install]
WantedBy=default.target
Then I set up the Pi Weather Station to start as a service at boot. sudo cp piweatherstation.service /etc/systemd/system
sudo chmod 644 /etc/systemd/system/piweatherstation.service
sudo systemctl daemon-reload
sudo systemctl enable piweatherstation.service
sudo systemctl start piweatherstation.service
This will start Pi Weather Station and set it up to start automatically when the pi boots. You can also use systemctl to stop, start, restart, or check the status of the Pi Weather Station service.
Configure Pi Weather Station API Keys and Location
Get MapBox Map API key, Tomorrow.io Weather API Key, and LocationIQ Geolocation API Key. All of these services have a free tier which should work fine for this purpose. MapBox required a credit card even for the free tier. Once you have your API Keys enter them in the Pi Weather Station settings along with your location information.
For the location information the GPS coordinates need to be entered in decimal degrees, if you don’t know yours check out GPS-Coordinates.org. Just enter your address and copy the latitude on longitude decimal degree coordinates. After the API Keys and Location information is entered click the SAVE button. When saved a file called settings.json is created in the applications working directory (in my case /home/pi/Projects/pi-weather-station). The settings are read from this file when the Pi Weather Station starts.
Launching Chromium and Pi Weather Station with the Desktop
It took a bit of tinkering to get this to work. Ultimately the instructions found in this forum post were successful.
Create a script /home/pi/start_piweather.sh containing the following: #!/bin/sh
chromium-browser --start-maximized --kiosk --incognito --user-data-dir=/home/$USER/.config/chromium2 --enable-features=OverlayScrollbar,OverlayScrollbarFlashAfterAnyScrollUpdate,OverlayScrollbarFlashWhenMouseEnter --app=http://localhost:8080/ &
Change /home/pi/start_piweather.sh to be executable: chmod +x /home/pi/start_piweather.sh
Add the following to the end of /home/pi/.config/wayfire.ini [autostart]
runme = $HOME/start_piweather.sh
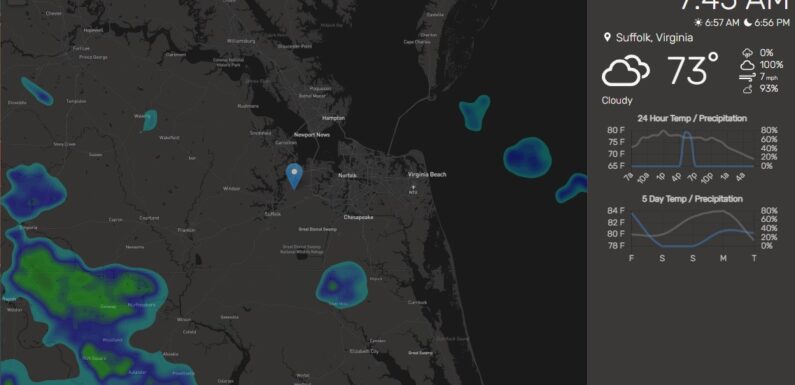
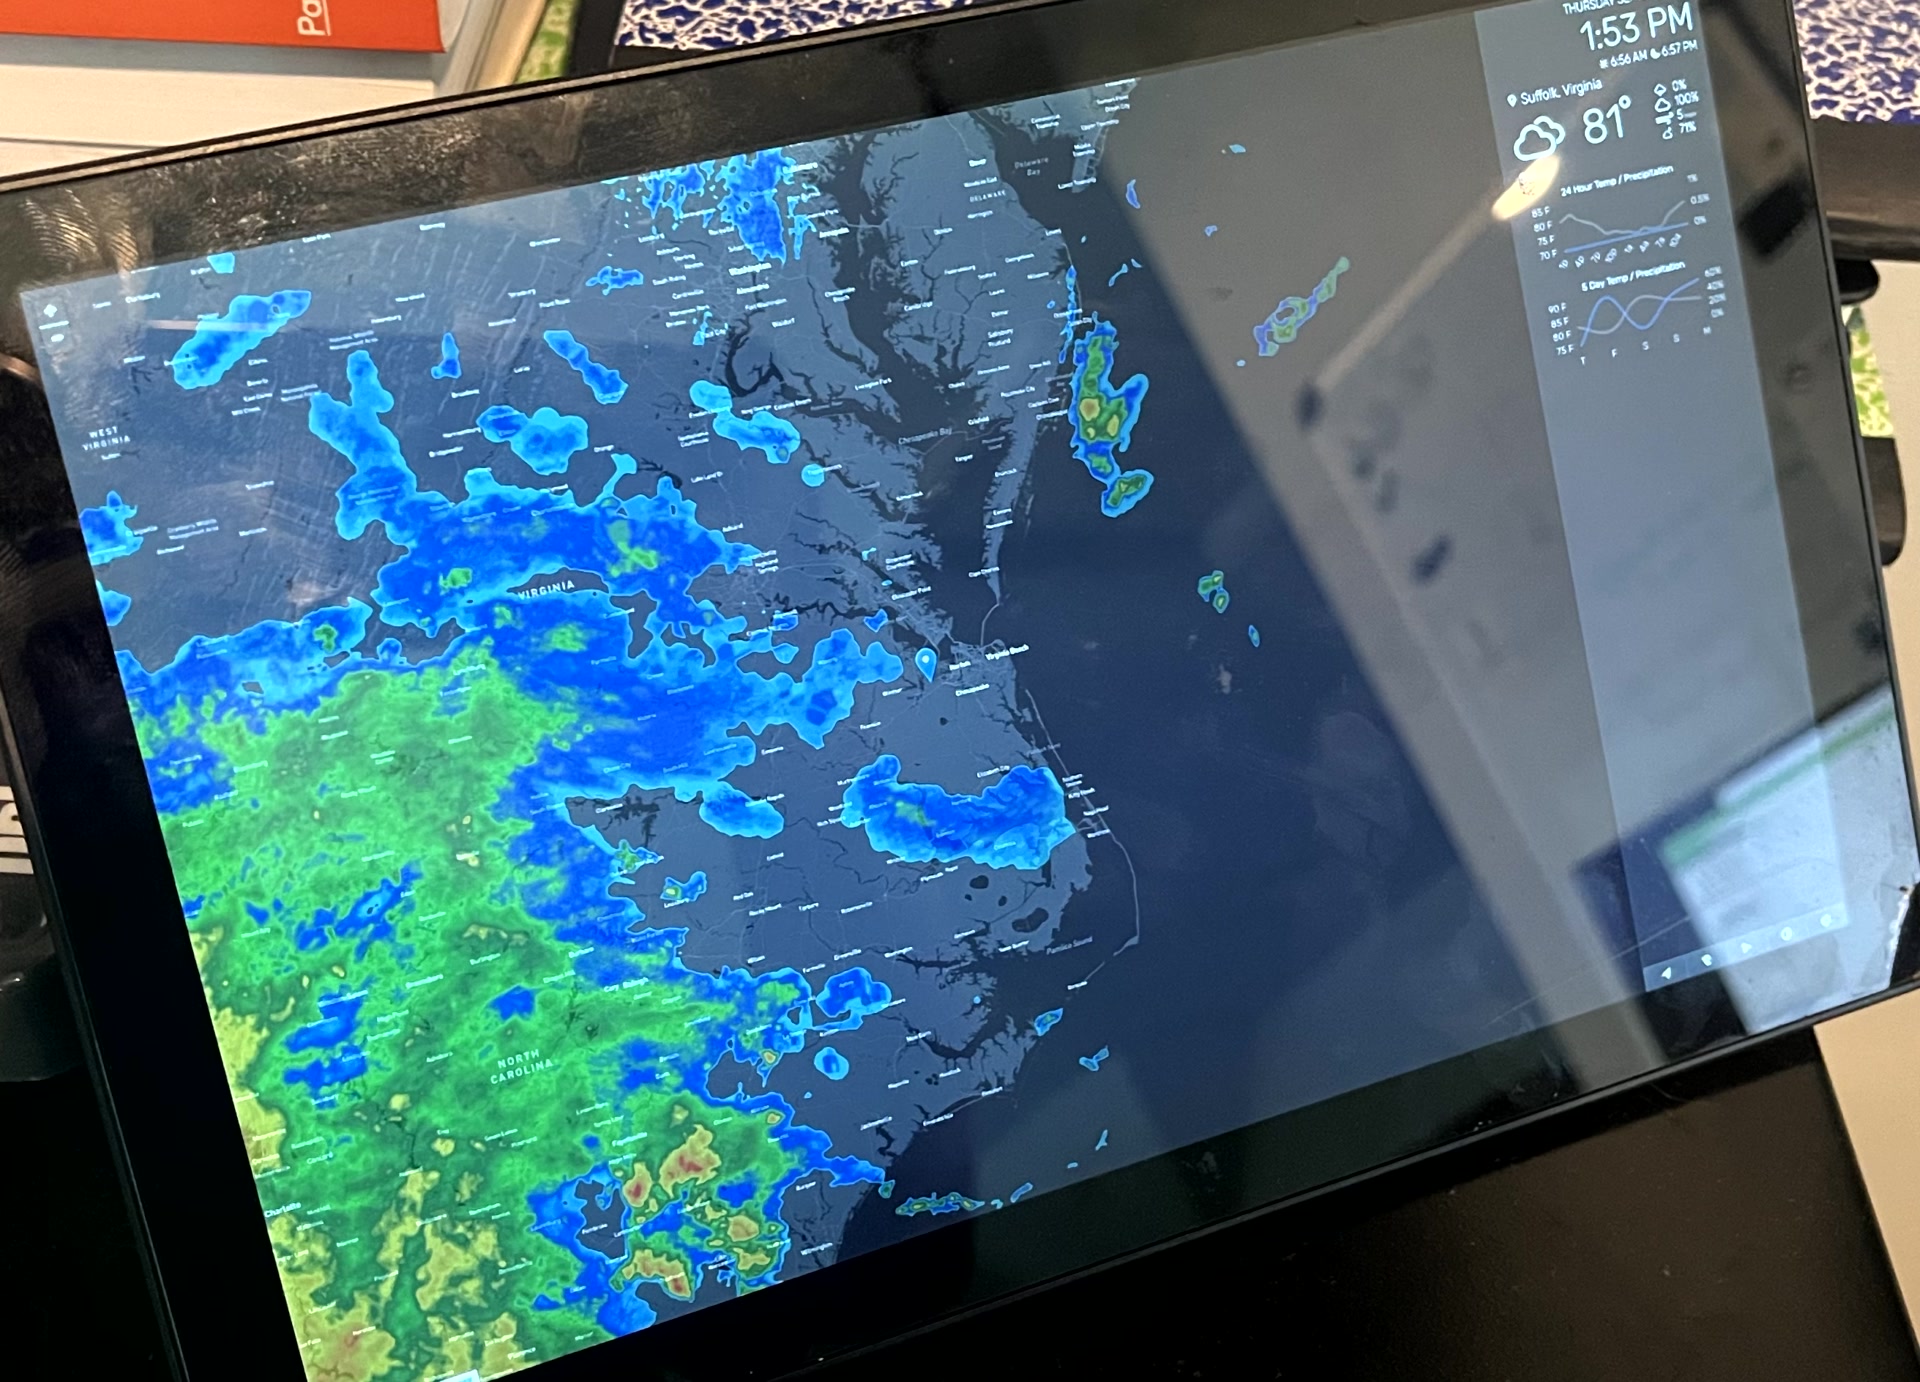
When Desktop environment starts the Chromium Browser launches in kiosk mode and opens http://localhost:8080/ which is where the Pi Weather Station is running. The Pi Weather Station provides a live radar map, current conditions, and a 5 day forecast.
Neat little project for a cool little desktop weather display.
7 thoughts on “Raspberry Pi Desktop Weather Display”
I had the basic setup of this working really well till recently. It stopped giving the details on the right hand side although the map and rain radar still showed. I eventually decided to start over totally and even though I got new Mapbox and Tomorrow data it still does not show the right hand details. I used the recommended Buster OS but you seem to have used a more recent version – is that right?
I had this same result after trying two different Pi’s. Obviously I am not alone. I just published the same comment up on GitHub…. I believe I am using the latest and greatest OS 2024-11-19. If you have any new insight into this I’d appreciate it. Thanks
This fork https://github.com/jimmysombrero/pi-weather-station fixed it for me. The api calls to tomorrow.io changed from get to post. I was working through this when I found this fork. All works as expected.
Thank you for all of the information. I finally managed to get the temp/other data to display correctly on the left hand side of the screen.
However, when I try to set up the program to boot up automatically, and run the last two commands namely:
sudo systemctl enable piweatherstation.service, and
sudo systemctl start piweatherstation.service
I receive error messages indicating “The unit files have no installation config (WantedBy=, RequiredBy=, Also=Alias settings in the [Install] section and DefaultInstance= for template units). This means that they are not meant to be enabled using systemctl.
As a newbie to Rasp Pi, I have not idea what the above means. Any assistance or guidance would be greatly appreciate.
I think you are going to need to configure it first. Edit the server/index.js to allow remote access (see the Readme file), start it locally using npm start, then access the configuration http://ipofpiweather:8080/ and configure the settings. Save them. Then try to start using systemctl.
Let me know how it goes, happy to help you figure it out.
Hi Hersey. Thanks for the suggestions.
Although relatively new to Rasp Pi, I will give your suggestions a try.
Will circle back to let you know how I make out.
 Once the OS is installed on the SD card, boot it up in the Raspberry Pi.
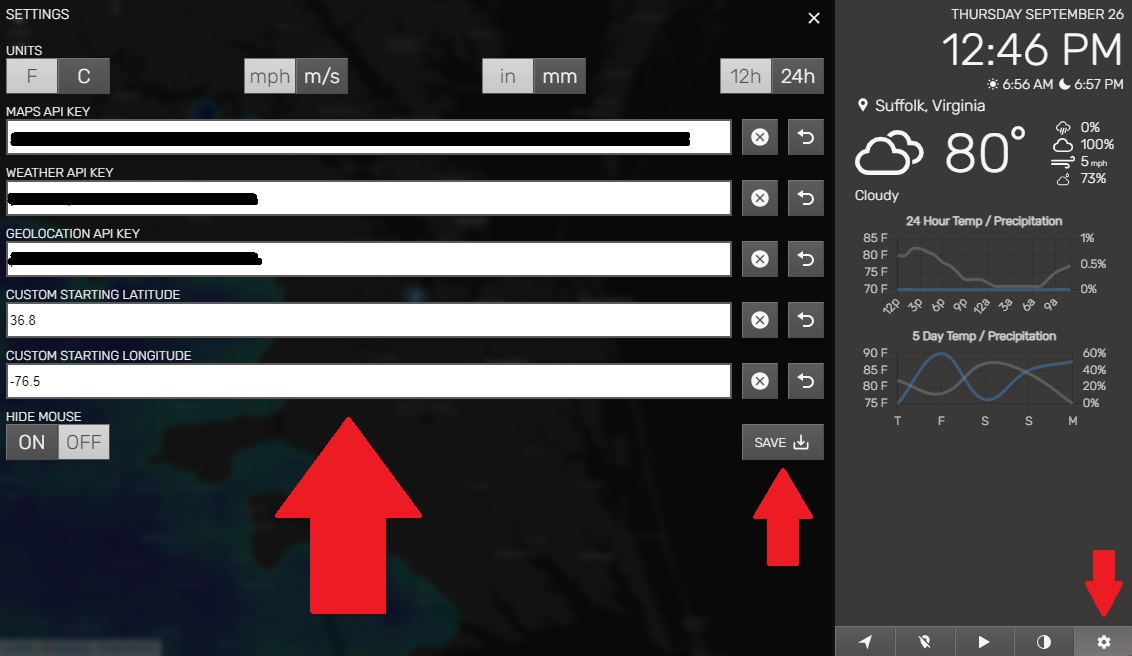


I had the basic setup of this working really well till recently. It stopped giving the details on the right hand side although the map and rain radar still showed. I eventually decided to start over totally and even though I got new Mapbox and Tomorrow data it still does not show the right hand details. I used the recommended Buster OS but you seem to have used a more recent version – is that right?
I had this same result after trying two different Pi’s. Obviously I am not alone. I just published the same comment up on GitHub…. I believe I am using the latest and greatest OS 2024-11-19. If you have any new insight into this I’d appreciate it. Thanks
Check out the solution in this issue: https://github.com/elewin/pi-weather-station/issues/66
Had to update the client/src/AppContext.js and change the 3 instances of data.climacell.co to api.tomorrow.co
After making the changes from the client directory run:
npm install --save-dev webpacknpm run prod
If you are not comfortable making these change, git it from here with the changes already made. https://github.com/aevans1987/pi-weather-station
Give it a try and let me know.
This fork https://github.com/jimmysombrero/pi-weather-station fixed it for me. The api calls to tomorrow.io changed from get to post. I was working through this when I found this fork. All works as expected.
Thank you for all of the information. I finally managed to get the temp/other data to display correctly on the left hand side of the screen.
However, when I try to set up the program to boot up automatically, and run the last two commands namely:
sudo systemctl enable piweatherstation.service, and
sudo systemctl start piweatherstation.service
I receive error messages indicating “The unit files have no installation config (WantedBy=, RequiredBy=, Also=Alias settings in the [Install] section and DefaultInstance= for template units). This means that they are not meant to be enabled using systemctl.
As a newbie to Rasp Pi, I have not idea what the above means. Any assistance or guidance would be greatly appreciate.
Thank you in advance.
Serge
I think you are going to need to configure it first. Edit the server/index.js to allow remote access (see the Readme file), start it locally using npm start, then access the configuration http://ipofpiweather:8080/ and configure the settings. Save them. Then try to start using systemctl.
Let me know how it goes, happy to help you figure it out.
Hersey
Hi Hersey. Thanks for the suggestions.
Although relatively new to Rasp Pi, I will give your suggestions a try.
Will circle back to let you know how I make out.
Thanks again and have a nice evening.
73
Serge
VA3SB